Showing posts with label chocolate. Show all posts

07 June 2012

Chocolate Truffles

I used some of my ganache as a topping for my chocolate cakes (also a recipe by Annabel and will follow soon) and I still had so much left. I only used 250 ml whipping cream and 250 grams of chocolate, but it was still more then plenty to coat a big cake. 
So I used part of it for some chocolate truffles, just like Annabel. She said whenever she made ganache she always have to make truffles. They were easier to make then I thought.

I poured some warm ganache in a bowl and added some butter. Depending on how much ganache you have, I’d use a tablespoon of butter or a teaspoon. A little bit goes a long way, but if you don’t put enough butter in it won’t get hard. That’s not a problem since the flavour will still be good; it’s just difficult to roll it into little balls. I also added a bit of liquor. I had Amaretto at hand so I used that, but I know some like Cointreau.
After it’s all mixed it went in the fridge so it could harden.
In a different bowl I mixed the ganache with some shredded coconut and some butter so I could have 2 flavour truffles.
I used a teaspoon to form little balls and roll them between my hands. After that I dropped them in coco powder and swirl the bowl around so the truffle gets a nice coco layer. I found out that it’s less messy if you just scoop a table spoon of ganache straight in the coco powder and form them into balls after they are coated.
As you can see I didn’t make too much…Have you noticed the little chocolate cupcake in the back?
This is all we have...thank god, because they were so good I could eat them all in one time!

Chocolate Ganache

Have you ever heard of Annabel Langbein aka the Free Range Cook? She’s this Australian lady who pretty much grows everything in her garden and who makes fantastic food using whatever she grows. Of course you can’t grow a cow or a pig so she gets her protein from farmers markets and friends. If you watch her show her food looks so easy to make, you can easily copy after watching the show.

What she has, is considered one of my dreams…to have a great big garden with all kinds of fruits, veggies and herbs.

I love to see her disapear in her garden and come out with all kinds of veggies and fruits. So far I’ve been able to grow is some viges, blueberries, grapes and a couple of herbs; nothing comparing to what she gets out, but it’s a start.

This year my peony bush finally bloom! I bought this tiny little sprig and finally after 2 years it gave me 7 flowers in total.
Isn’t it pretty?
It’s overpowering my grapetree right now so I’ll have to do something about it this weekend. I grow it right in front of the house so it’s the first thing I see when I leave the house. One of my neigbours even complement me on it. She loves passing by and see the flowers blossem a bit day by day.

Anyway the other day she made chocolate ganache in her show. Her recipe was just too easy: equal parts of whipping cream and dark chocolate. She used 500 ml cream and 500 grams of chocolate. And she always uses the best chocolate she can find. Since I don’t really taste the difference between high quality chocolate and cheap stuff, I go for the cheap stuff. Maybe when my taste buttons develops more I’d switch to the high end stuff.
All you’ll have to do is cook the cream till you see little bubbles form on the edge of the pot. Then take it off the fire and put all the chocolate in.
Let it sit for a couple of seconds and then mix it all together till it’s one smooth and shiny mixture.
Pour it in a jar and store it in the fridge. How simple is that?

This ganache is a great base for chocolate truffles which I, just like Annabel, also ended up making.  

01 December 2011

The mini series: chocolate flower cups

After making apple pie I still had a bit of dough left. It was sitting in the fridge waiting for me to come up with a smart idea. Although the apple pie was good I didn’t want to make more. I decided to roll the dough out as thin as possible and to put them in a mini muffin tin till I figured out what to make.
I used a peanut butter jar to roll the dough out. Who needs a fancy rolling pin anyway =) 
And yes, I left it in the same plastic bag I stored it. I was watching tv and didn’t want to dirty more stuff.  

With a cutter I cut cute little rounds and put them in the muffin tin. I barely had enough for 24 cups but I made it. Now what? Chocolate is always a good idea. And chocolate with some orange zest is just heaven; 24 pieces of heaven it is.
I melted one bar or dark chocolate (about 100 gram) and added about a teaspoon of orange zest. I just love the smell of those two together.

Then I mixed 2 eggs and one tablespoon of flour with the chocolate. That wasn’t a good plan at all. The chocolate turned from smooth to lumpy. I didn’t want to throw it out (of course not!!) so I had to stir till my arm fell off. It got a bit smoother, but since I would bake it in the oven I thought I would be ok.

I preheated the oven on 180C and in the mean time I scooped a bit of chocolate in the cups. You see that lump? At least it’s a lump of chocolate, could’ve been worse. I lucked out cuz again I had enough.
I baked them for 10-15 minutes till the chocolate double in volume.
They were so cute when they came out! Like little flowers...the best time to eat them is when they are still slightly warm.

Ps: I want to thank everyone for their support during the eye surgery process. It’s very much appreciated! One more eye to go next Tuesday.

03 November 2011

The mini series: chocolate lava cupcakes

After the teaser pics in my last post I just had to make the chocolate lava cakes. It just wouldn’t be right not to. Besides I have something to celebrate. Well it might be a bit too soon to celebrate, but hey, any excuse for making lava cakes works for me.

As you all know I’ve been wearing my glasses for a bit more then a month now. Yesterday I had a check up and my eyes are suitable for a lens implant. WHOEHOE! I’m so exited! Especially since the doctor will num my eyes with drops in stead of needles. I’m a big chicken, super scared of needles but the drops are awesome. They gave me one drop during the check up and I didn’t feel anything!
The only down sight is that if they don’t have the lens in stock it will take up to 12 weeks to custom make it for me. That would mean I can’t have it done this year, but have to wait after I come back from my holiday. Oh well, I can wait…another 3 months won’t kill me. I’ve taken the first hurdle…another 2 to go.

So back to the mini lava cupcakes. I bet you’re all exited…here goes:

As I don't remember what I did the other day I tried to remake it. It was tasty, but didn't quite taste/looked the same.

For 20 mini cupcakes I used:
- 100 grams of room temperature butter
- 4 table spoons of sugar
- 1 tablespoon of cocoa powder
- 4 big table spoons of all purpose flour (3 if you like it soft and moist)
- ½ teaspoon of salt
- 1 egg
- ½ teaspoon of baking powder
- 1 bar of dark bittersweet chocolate
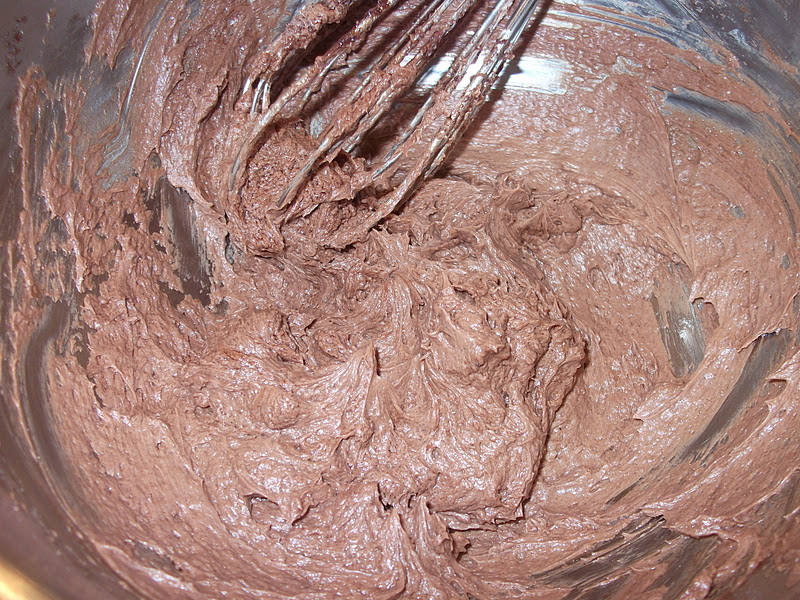
I stared with mixing the butter with the sugar, salt and the cocoa powder.
Then the egg and baking powder went in. I mixed it till the sugar dissolved.
Last but not least I added the flour. I added it spoon by spoon, making sure all the flour was well incorporated before I added another spoon.
I chopped the chocolate bar in little bits, small enough to fit the molds, but big enough to have it "run" out of the cake. This bar was a bit too much so I still had some bits I could snack on.
I preheated the oven on 180C degrees and while that was doing its thing I filled the molds with one scoop of batter.
In the middle I pressed one piece of chocolate. It’s ok if it’s still sticking out for a bit. The cakes will rise and the chocolate bits will slightly sink.
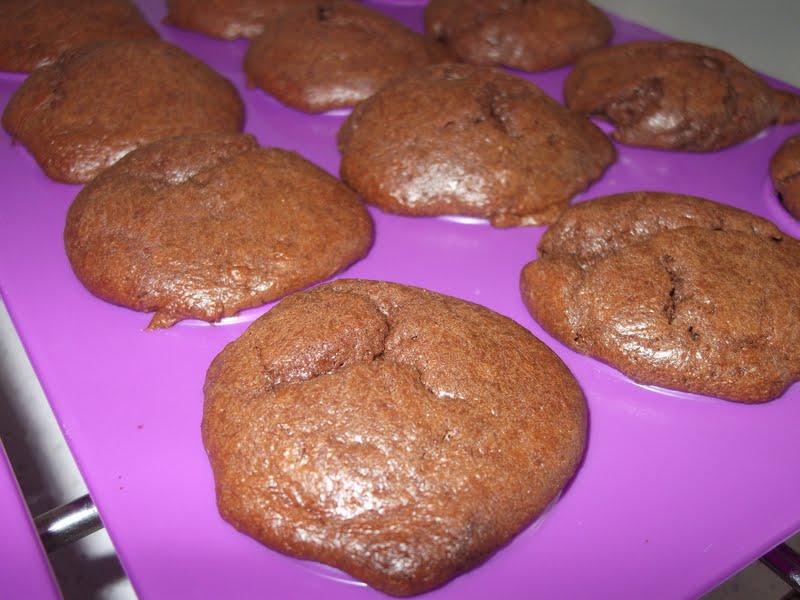
After about 20 minutes they were done.
They didn’t rise as much as I though they would and they weren’t as moist as the first time.
But that sprinkle of sugar dust does make them pretty =)
 
The outside had a nice crunch like a cookie, but the inside was moist and had that running chocolate. It was good, but not like the first time at all. Luckily I know what made the difference. It was that extra scoop of flour. So if you like your cake soft and moist, add 3 tablespoons of flour instead of 4.

19 October 2011

No bake mouse cake

I’ve got this fantastic book with recipes and pictures that can make chocolate lovers cry with joy. This particular recipe got my attention and I was lucky enough to have all the ingredients. So there was nothing to hold me back.
I was really looking forward to have this mascarpone quark pie. As you noticed the title is not mascarpone quark pie. Well maybe you didn’t but the bottom line is there is no mascarpone quark pie. I wish there was…that picture looks fantastic!
Let me tell you what happened:
I started with making the pie crust with some amaretti cookies and melted butter. The recipe called for 275grams of amaretti cookies and 75 grams of melted butter. I used about 50 grams of butter and it was enough. As I don’t have a scale I eyeballed the cookies. One more or less wouldn’t be a problem.

I used a pestle to crush the cookies and then added the butter. After mixing it I poured it in a cake pan and use the round side of my spoon to press it to the sides and the bottom. And to make sure it was pressed enough I used a glass to press it even more. Then it had to set in the fridge for about 30 minutes. Mine was on the table waiting for the stuffing.

The stuffing called for 700 grams of mascarpone, 3 eggs, some vanilla, sugar, flour, coffee liquor, espresso and chocolate. I melted 100 grams of pure chocolate and added one cup of espresso, the zest of 1 orange and a bit of amaretto liquor (my own twist on the recipe).
Then I tried to cream the mascarpone with some sugar and egg yolks. And that’s where things went wrong. I don’t know what caused it (must be me of course) but the mascarpone started to curdle. It was a disaster! The pie was ready and needed to be stuffed and now the stuffing failed!! I was slightly panicking. Lucky I didn’t add the chocolate yet. Then I remembered I still had some whipping cream in the fridge. I took it out and started to whip it with some powdered sugar till it was still a bit runny.
To my melted chocolate I added 250 grams of mascarpone and mixed it till it was a smooth mixture. Then I added this to the whipped cream slowly bit by bit. I didn’t want to over mix this otherwise I would really be in trouble. Because of all that happend I totally forgot to take pictures!
When everything was mixed I was so happy. The mouse tasted GOOD (I couldn't resist licking the bowl)! I poured everything on the pie crust and put it in the fridge so it can set up.
The pie was a winner! The mouse just melts in your mouth. I can’t believe I never made this before. This idea was born out of panic. I think I should panic more often!

To make sure I’d be able to make this again I used:
-         275 grams of amaretti cookes (give or take)
-         50 grams of melted butter
-         ½ liter of whipping cream
-         250 grams of mascarpone
-         100 grams of dark chocolate
-         1 small cup of espresso
-         a dash of amaretto liquor
-         zest of one orange
-         powdered sugar

Make the crust with amaretti crumbs and butter.
Melt chocolate then add the coffee, orange zest, amaretto and when it cools off the mascarpone.
Whip the whipping cream till almost firm.
Add the chocolate mixture bit by bit.
Pour the stuffing in on the crust and let it set in the fridge.
Cut a slice or 2 and serve.

Ps: next time I would use a different cookie for the crust. This one was surpose to be baked in the oven and because it wasn't it got a bit soggy.

17 September 2011

Easy chocolate mousse

Sometimes you aren’t making anything and sometimes you almost live in your kitchen. Well it helps that the weather wasn’t working in our favor as well. It was raining and getting cold. Great time to experiment with different dishes. Today I manage to do 3 dishes, my daikon cake (first time ever), the chao and this easy chocolate mousse.

Can you believe I’ve never made my own chocolate mousse before? My neighbor made homemade chocolate mousse earlier and it was soooo good. I only wanted to have one spoon, but end up eating the whole bowl!! I asked her how she made it and she told me she had egg yolks in it. If there is anything I prefer not to work with is raw eggs. It’s fine when other people do (and I don’t necessarily have to know about it) but for me…well it try not to. 
So this mousse is made with only whipping cream, sugar and dark chocolate. How easy is that?
I started with melting my chocolate (180g). I normally melt it in the microwave but since I burned myself (because it got too hot), I prefer to do it this way (double boiler). It's easier to control.
The chocolate melted in no time. I took it of the stove and set it aside while I whipped the whipping cream (500ml) with some sugar till it was nice and thick.
Then I gentle fold in the melted chocolate. And to be honest…I also used my mixer just to make sure the chocolate was well incorporated. Only for a second…
I’d like to save my yoghurt and crème brûlée jars so I could reuse them and this was a perfect opportunity.

It was enough to fill up 8 jars to the rim. They are now setting in the fridge. I can’t wait till tomorrow…but I already know they will taste good…the spoon and spatula are licked clean.

I’m having movie night with my hubby now. Have a great weekend!


The next day:

It’s right now and I just finished my first chocolate mousse jar.
I was very happy to see that it was nice and fluffy.
Although it was a bit sweeter then I thought I would be (next time I just skip the sugar), it was till very good. I think a nice citrus salad or some cherries would balance the flavors out just right.
7 more jars to go...

25 June 2011

The mini series: chocolate cherry soufflé


I bought the cutest things the other day…mini (cupcake/muffin) molds. One mold holds about 12 mini cups and I bought 2 molds to start with. Then when I tried it the first time, making cupcakes from a store bought cake mix, I found out that 2 wasn’t enough. I needed at least 4 so a couple of days later I went out and bought 2 more. So now I am the proud owner of 4 mini cup molds.
These cupcakes were made with the new molds and if you look at the M&M you see how small they are. It doesn’t even take 2 bites to eat them! As much as I liked those cakes I prefer the ones made from scratch. These were much too sweet to my liking. At least when you make things from scratch you can control the sweetness.

I got inspired to do much more with the mold then just baking cakes. The mini series was born.
Because I didn’t want to make a big batch I had to adapt the quantity of the ingredients. I wanted to do something with cherries and chocolate and I had both of them at hand. I first put half a cherry in each cup. Then I mixed the ingredients together.

This is what is used:
-          150 gram butter
-          100 gram dark chocolate
-     1 egg 
-          1 teaspoon baking soda
-          1 teaspoon vanilla extract
-     pinch of salt
-          2 tablespoon flour
-          2 tablespoon quark
First I melted the butter and the chocolate in the microwave. It only takes a couple of seconds to heat it up. Then I stirred well till the mixture was shiny.
To a well mixed egg I added the chocolate. I also preheated the oven on 150 degrees.
Then I added the flour, baking soda, salt and quark.
After everything is mixed I use a little spoon to scoop this mixture in the molds. It was very difficult to put it in without spilling it and this was as good as it gets. I just had enough to fill 12 cups. By this time the oven is hot enough and I baked them for 30 minutes.
They came out so fluffy! It was something between a cupcake and a soufflé; a cupflé or a souflake? I’ll go with souflake =)
They were so mini I had to serve them on a teabag holder/dipping bowl.
The cherry went very well with the chocolate. And because I didn’t add any sugar they weren’t sweet enough. But that’s the way I like it. For those who like it sweet; some dusted powder sugar would help and will also make it look pretty.