Showing posts with label chicken. Show all posts

16 June 2012

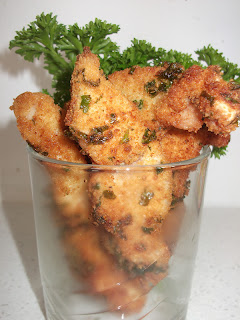
Fried chicken fingers

The Dutchies are very very nuts about soccer and the last few weeks the streets were decorated with orange flags. Holland has one more chance to go to the next round, but if they lose the next game I’m sure all the orange will disappear soon. I’m not a big fan of soccer. Well I’m not a fan at all, so while my hubby is watching the game I had time to prepare some finger food. I wanted to buy some chicken nuggets at the supermarket, but when I saw that only 80% was chicken and the other 20% something else I decided to make some myself. At least it will have 100% chicken in it.
I used 3 chicken breasts which I rinsed, dried and cut in finger size bits.
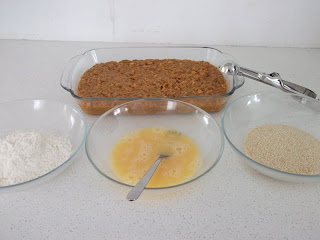
Then I set up my batter station.
To my store bought bread crumbs I added some salt, pepper, garlic powder and some freshly minced parsley.
To get a really nice crust on the chicken I covered it first with some plain flour. Then it went in the egg mixture and last in the bread crumbs. I know I could probably bake them in the oven, but since we were all pretty hungry I fried them in some oil.
It only takes a couple of minutes to brown and after they are done I drained them on a piece of paper.
The chicken fingers were so good they disappeared in no time.
The parsley really gave it a nice touch and although I didn’t season the chicken first they were still full of flavor and super moist.
My hubby already said no more KFC for him since these chicken fingers were way better!

Hope you all are enjoying the weekend. I'm going back to the kitchen for a father's day
Black Forest cake or Schwarzwälder Kirsch cake.

09 November 2011

Sup mang cua (chicken crab asparagus soup)

I realize that it’s been quite some time since my last post. To be honest it’s been quite some time since I’ve been online and reading other people’s blogs as well. But today I tried to keep up with some of my regular blogger friends. I’ve been missing so many great recipes! But I’ll try my best to keep up from now on.
Remember I went to the clinic for a check to see if my eyes were suitable for lens implants? About 2 days after they called me and they had the lenses in stock. I am scheduled to have the first eye surgery next Wednesday. I’m exited but super scared as well. The other day I had to come back so they could make tiny small holes in my iris to prevent any pressure on my eyes. Of course I was scared, but everything went well and looking back it wasn’t as bad as I thought. I hope I can say this after Wednesday also. The second eye will be done on 9 December and I know I will be so relieved after that.
About a week ago I hit a nasty computer virus again. And again all the pictures I took were gone….*sigh*. I don’t know what the deal is with those viruses, but after hitting 2 after another it wasn’t much fun anymore. Luckily I already added the picture for this post in a draft. I’ve made this soup about 2 weeks ago. We normally eat it at special occasions but I just make it whenever I crave it. That’s one of the advantages of being the “chef” in the house.

For a big pot of soup I started boiling some chicken with some slices of ginger and salt. I used 3 chicken thighs and 2 legs and scooped all the foam out to get a clear broth.
In the meantime I shred 400 grams of crab sticks (imitation crab) and put it aside. Since it’s already cooked it will go in last.
When the chicken was nice and tender I took them out and shred them in pieces.
To the broth I added the juice of 4 small cans of white asparagus and the asparagus cut in 2-3cm pieces. Also the shredded chicken went back in.
After boiling it for a couple of minutes I added the crab sticks. Those are the white/pink “strings” you see in here. If you have fresh crab meat you can add that now. Make sure you taste the broth to see if it is to your liking and add salt if needed.
To make the soup thicker I used some potato starch. As far as I know this is the only starch that binds and stays clear so make sure you use this and not let’s say corn starch.
In a bowl I poured some broth, let that cool down a bit and then added some spoons of starch. Don’t add it straight into the hot broth otherwise you’ll get lumps. The starch always sinks to the bottom so you will have to mix it well before you add it to the soup.
I normally make sure the soup is boiling and with one hand I’m stirring the soup and with the other hand I slowly add the starch mixture. I keep stirring it till all the starch is in. You can instantly see the soup thicken. I cooked it for another couple of minutes and then it was time to eat.
I scooped some soup in a big bowl and added some coriander and spring onions on top. Just some grounded fresh pepper on top and it was time to dig in!
We all ate like 2 big bowls so there were barely any leftovers. Even with the imitation crab it was that good.
Hope you all enjoyed the weekend. I'm getting mentally ready for work tomorrow...

17 September 2011

Chao ga (chicken congee/porridge)

Remember I told you I would keep that nice chicken broth? Well since I kept it outside I made sure I bring it to a boil for a couple of minutes every day. It would be better to store it in the fridge, but there’s simply no room. I understand that if I keep doing this long enough it would be referred as a “master stock”, one stock in which you continue to cook your chicken, pork etc. Well I’m not planning to keep it that long. In fact I already used half of the broth for my chao.

My sister and hubby weren’t feeling to hot today and there is nothing more comforting then chao. And nothing easier to make either.
When we were young and we were ill, my mom use to make just plain chao with rice and lots of water (nothing more then that) and we had to eat it with sugar. JUK! Still now I can’t have any sweet rice pie…just reminds me too much of ill people’s chao.
I still had some of yesterday’s rice left which is perfect for this. It all went in the pot after the broth boiled. I turned the fire low so the rice could soak up all that nice chicken broth and had time to fall apart.
If you don’t have any cooked rice you can just use uncooked rice. It just takes a bit longer. Bring the broth to a boil and add the rice. Stir every once a while so the rice doesn’t stick on the bottom. Remember a little bit of rice goes a long way when you make chao.
As I don’t like my chao too thick I had to add some more water and some salt. I like it well seasoned. When you can’t see the rice shape it’s done. With chao there is no overdone, just underdone. As long as you still see the rice shape you know it has to cook it a bit longer.
While the chao was simmering I had time to chop some spring onions and cilantro. We always use this combo of herbs on our chao.

From that whole chicken I cooked for my goi ga the other day, I only used the breasts and the drumsticks, so today I had the thighs and the wings left.
I made another batch of goi ga, but as you can see it doesn’t look as nice as the one made with breast and drumsticks.
Normally chao has beans sprouts as well, but I didn’t buy it. I wasn’t planning on making chao. In fact I wasn’t panning dinner at all today. To busy making daikon cake (recipe will follow) which is sitting in my fridge right now. I’m crossing my fingers that it will set enough to fry tomorrow.
The goi ga went really, really well with the chao. It will for sure cure anything!

16 September 2011

Goi ga rau ram (Vietnamese chicken salad)

The other day I was craving goi ga (Vietnamese chicken salad). Partly because I have a very nice bunch of rau ram (Vietnamese mint/coriander) in my back yard that has to be eaten and partly because I love the sweet and sour onion slices I use for this salad.
My excuse for this salad was very much present in my yard. I actually grew these myself. I bought some rau ram and ate almost all the leaves. Then I soaked the stems in a jar till they developed roots. I’ve kept them in a jar for quite some time till I thought they had enough root so survive in the soil. If I knew they would love to be outside this much I would’ve put them out earlier. Before it gets too cold I’ll cut some off and start the process all over. I’ll try to see if I can grow them inside so I can still enjoy them in winter time.
These were getting plenty of sun and developed long strong smelling leaves! Only thing needed now is hot vit lon (duck eggs) or this chicken salad.

I know there are many recipes for this salad, but this is my one of my own. Just because it is so easy and the onions are really good in combination with the chicken and the rau ram. I hope you’ll give it a try.

For this salad I used:
-          one whole chicken (breast)
-          a couple of onions (I used 4 small ones)
-          vinegar
-          sugar
-          some rau ram leaves
-          nuoc mam gung (Vietnamese ginger fish sauce)
I started with slicing the onions in very thin half rings. In a big bowl I poured the vinegar and sugar and stirred till the sugar was dissolved. I wanted the mixture to be sweet and sour and depending on your own taste you can put more or less sugar. Then the onions went in. They have to marinate for at least half an hour so the loose that onion sharpness and suck this sweet and sour in.
I stirred it every couple of minutes to make sure every piece of onion got soaked. After half an hour they look like this; slightly less in volume but packed with flavor.
While the onion is marinating I started cooking the chicken. As I didn’t had any chicken breast I cooked a whole chicken in some ginger seasoned water till it was done. This broth can be used for some rice congee/porridge. Even for some chicken pho if you really crave it. I’m still thinking about what to turn it to. So many options and only one pot of broth.
I already had some nuoc mam that only needs an additional ginger to make ginger fish sauce. For this basic fish sauce you can go to this link. For nuoc mam gung you need to crush or grate some ginger and you’ll have ginger fish sauce.

In a big bowl I shredded the chicken (I used the breasts and the drumsticks) in big junks, added the sweet and sour onion (I squeezed them dry) and the rau ram. Last but not least I seasoned the salad with the ginger fish sauce. And that is all this salad needs.
We had it as a side dish with our stuffed tofu, green beans and rice and it didn’t really go well together. A better combo would be with some rice congee. So we ate our rice and snacked on this chicken salad after. I had a bit left and ate it the next day. It was even better so don’t through out any leftovers!

25 August 2011

Chicken sate bitterballen

I know you all are very curious of what I did with the chicken I made earlier. Well it was sitting in my fridge (where would we be without refrigerators) till yesterday. I wasn’t in the mood for eating it with rice or noodles or bread. Instead I wanted to transform it to another dish, but couldn’t decide. Shall I make chicken pot pie, or pasta with chicken or a simple chicken omelet?
Then it hit me; why not make chicken sate bitterballen. For the non Dutchies out there, a "bitterbal” is the “krokets” younger sister. Or more like smaller, rounder sister. There is no English translation of it so a bitterbal is a bitterbal and a kroket is what you call a croquet. Apparently croquets are more familiar that’s why there is an English word for it. But both are delish and we Dutchies love them. My absolute favorite is the one with chicken sate.

I have never ever made chicken sate bitterballen before, so this is a first. I think it is first for most of you. Although it is not difficult to make, it is of course so much easier to buy it. And they have very good ones in the frozen section (if you live in Holland) or you can pull it out of the wall. Fast easy and super “lekker”. Well since I’m making a typical Dutch snack I thought I’d throw in some more Dutch words.

This is a dish you have to make one day ahead, or have plenty of room in your freezer because it has to set for some time.

This is what I used:
-          500 ml water
-          10 tablespoons of sate mix (same package I used for my peanut soup)
-          50 gram butter (note to myself: about 1cm)
-          50 gram flour (2 full tablespoons)
-          1 onion
-          1 teaspoon of salt
-          1 teaspoon of hot chili sauce
-          1 small roast chicken
-          10 tablespoons of water (next time I won’t put extra water in the mixture) 

I started with boiling the water with the sate mixture. If I would make a different kind of bitterballen I would boil the water with one bouillon cube. After it boils for a couple of minutes I took it off the stove and let it cool down a bit.
I took all the meat off the chicken and chopped it in small cubes. I guess you can use your hands to tear it apart as well, but I thought chopping would be faster and easier. That one little chicken was enough for this bowl of meat.

I also chopped one onion in small cubes.
All the ingredients are ready.
The butter went into the pot as well as half of the chopped onion. After the onion became translucent I added the flour.
As the stove was on medium I turned it to low so I could slowly cook the flour mixture.
Then slowly bit by bit I added the sate sauce. I incorporated the sauce in the flour before I poured more.

Because the mixture looked too thick I added some extra water. Next time I wouldn’t because it turned out that the mixture had the right thickness. So please DON’T add any extra water.

I only wanted to use half an onion, but I thought why not so I added the other half.
After it cooked for a bit I added the chicken and some chopped spring onion. Just because it was sitting in my fridge, so it’s optional.

I tasted the mixture and added the salt and the chili sauce. Add as much or as little as you like. If the stuffing taste good your bitterballen will do to.
I waited till it started to bubble and then poured the mixture in a tray. I covered it with plastic foil and put it in the fridge so it could cool off and hopefully thicken.
Today I put the flour, the eggs and the breadcrumbs ready. I took the chicken sate mixture out of the fridge and I was happy to see that it was a bit thick, but not thick enough as I discovered later. So DON’T add the extra water!! I can’t stress it enough.
I used my mini ice cream scooper to scoop little balls and drop them in the flour. As they weren’t firm enough it was difficult to form them in little balls.

I did the best I could and after they were covered I rolled them through the egg mixture and right into the bread crumbs.
Well this one looked pretty round…for now…

At first I did one at the time and then found it easier to just scoop a batch, roll them in all the mixtures and the start a new batch. This so I don’t have to wash my hands all the time.
I poured enough oil in my pan to cover at least half of the bitterballen and waited till it was hot enough. I always put my hand above the oil and if it feels hot enough, it is good to go. You can also drop a little bit of dough in the oil and when it immediately started to bubble up you know it’s good. But I found that the hand method works well for me.

Of course you if you have a frying pan it is easier to fry these. And it helps if you have enough oil to cover the balls, but if not then just make sure it will cover at least half of it.

If you can fry spring rolls you can fry bitterballen =)

Since they are freshly made they only need a couple of minutes. Make sure you keep an eye on them and flip them over once they are golden. If your heat is right they will not burst. You don’t want that nice chicken sate to ooze out.
After all this hard work it is reward time!
Bitterballen are the best straight out of the pan. Just a little warning; make sure you don’t burn yourself. The chicken sate stuffing can burn your mouth and ruin it for you.


Ps: I made so much I had to put some in the freezer. I froze them on plate first, making sure they didn’t touch each other and after they froze a little I put them together in a bag. If you put them in a bag straight away you will never manage to separate them again. Next time I’d like to eat them I would just through them in the hot oil, no defrosting needed. Since they are frozen they need a bit more time.

22 August 2011

Roast chicken


Ok remember I said I would post a recipe for reusing the sparerib marinade tomorrow? Now normally tomorrow is not a couple of days later, but I was kinda busy the rest of the week and this weekend.

My friend and his gf came over from Vietnam and stayed for the night. We met during summer camp when we were both 17-18 and kept in touch since. He use to live in Holland but decided to follow his brother and go to Vietnam for work. There he met this cute girl who happens to have the same name as me. So it is kinda confusing. But work out ok since she calls me “chi” which means big sister and I call her “em” (little sister). It is the appropriate way to address someone who is older or younger then you. As I am a few month older then my friend he should call me “chi” as well, but among friends we just use each others names or just speak Dutch. In Dutch and English everything is you and me.

We stayed up talking till 2.30 in the morning and I got up at 8. I was beat! That’s one of the first signs that I'm getting old. My body isn’t used to staying up late and wake up early. It took me 3 days to recover!
When I was dating my hubby (long distance) I stayed up till 3-4 in the morning to talk to him and got out of bed at 8 to get to work. And I was fine! Not tired at all. But that was then when I was young and flexible =)

So now that’s out of the way I'll get back to my sparerib marinade. And this recipe is just dead simple. After all the afford I put into making the marinade it helps to know that I get 2 meals out of it.
I dropped one whole chicken in the marinade and I just let it hang out in there. As I was leaving the pot outside I brought it to a boil and flipped the chicken over and cooked it for another couple of minutes. I took it off the stove and left it swimming in the marinade for one day.
The next day I cooked it again till the chicken was done.
This chicken was so soft and juicy and all it needed was a bit more color.

So I brushed it with some sweet chili sauce and put it in the oven I heated on 180C degrees for 10-15 minutes. Make sure you flip it after 5-7 minutes and that you’ll keep an eye on it.

When your chicken is golden brown it is time to eat. It’s great with rice or noodles. Even with bread it’s great.

I just had so much food left that this one is now waiting for me in the fridge. I have big plans with this chicken. 

28 June 2011

Peanut soup

I’ve been cooking loads of mini food with my mini molds but now it is time for a little break. Time for some real food. Something different…really different.


I used this to make my peanut sauce. Here in Holland we love our fries with peanut dipping sauce. I kinda made too much and I didn’t want it to go to waste so I turned it into peanut soup. It was dead simple.


This is what I used:
-          2 chicken legs and thighs
-          half a can of corn (about 4 tablespoons)
-          4 middle sized potatoes chopped in squares
-          peanut sauce (store bought)
-          salt and pepper, hot sauce
-          chopped spring onion
I stared with making a bouillon with the chicken legs and thighs. This means that after I rinsed them they went into boiling water with some salt till they were soft. Then I got the chicken out and let them cool a bit.

Now it was time to add the peanut sauce and the potatoes. Boil this till the potatoes are done.

In the meantime the chicken was cold enough to handle so I removed the skin and shred the chicken meat. Depending on your preference you can have big or small junks. I kept this aside till the last couple of minutes.
When they potatoes were soft I added the chicken, the corn and some dashes of hot sauce and let it boil for a little bit longer. A last taste test and then it was time to eat! To add more color I added some chopped spring onions.
The soup was so flavorful and even better the next day. I don’t think you can substitute the peanut sauce for peanut butter, but who knows. Make sure you try a small amount first!