27 October 2011

The mini series: lemon poppy seed cupcakes

Have you missed it? I know I have. It’s been way too long since I did my last mini series and now since I started yesterday I can’t seem to stop. You all know I’m not a much of a baker. I like to “wing it” too much and I can’t seem to follow a recipe. On top of that most recipes call for bigger quantities that good for me. So that’s another reason why I love my mini cupcake mold so much. I don’t feel so bad if I pop one or two or more in my mouth.
Yesterday I made chocolate lava mini cakes and they were great!! Wait there’s more…
They were so great we finished one whole batch in a couple of seconds. Unfortunately since I wasn’t planning on blogging about it I didn’t make notes of the measurements. I know it had some butter, 1 egg, 1 tablespoon of cocoa powder, 4 tablespoons of sugar, 3 tablespoons of all purpose flour, some baking powder and of course some bits of dark chocolate. I mixed everything together and baked it for 20 minutes in a preheated oven of 180C degrees.

Voila mini chocolate lava cakes!

I’m going to remake these and write down the measurements, promise!

After yesterdays adventure I thought about making it again today. You can’t have enough chocolate, but I was craving something else. Something tangy with a bit of a twist. I looked in my cabinet and there it was…one jar of poppy seeds. That together with some lemon makes a terrific combo for these cupcakes. So I grabbed a pen and paper and started writing things down.

This recipe only makes 21 mini cupcakes so don’t invite too many people over:
- 100 grams of butter
- 4 tablespoons of sugar
- ½ teaspoon of salt
- 3 tablespoons of fresh lemon juice
- 1 egg
- 4 tablespoons of all purpose flour
- ½ teaspoon baking powder
- 1 teaspoon of lemon zest
- 1 tablespoon of poppy seeds 
I started with mixing the room temperature butter with the sugar and salt. Then I added the lemon juice, lemon zest and one egg.
When everything was combined and the sugar dissolved I added the flour and the baking powder and gave it a good whisk.
Last but not least I added the poppy seeds. 
Did I mention that I didn’t use a mixer this time but did everything by hand? It was a good work out; 2 cupcakes more for me =)
I preheated the oven on 180C degrees and started to fill the molds.
I baked the cakes for 20 minutes till they were golden brown and put them on a rack to cool.
Of course one or two mysteriously disappeared. But they left a nice sweet, tangy and nutty flavor.
Don’t you just love the poppy seeds just pops in your mouth when you bite them?

I called my sister down and some more cupcakes disappeared. I don’t think they will survive the night. I better get some before they're gone.

26 October 2011

Sweet and sour bean sprouts

I had it all figured out; for dinner “thit kho” wrapped in rice paper with some sweet and sour bean sprouts. I bought a big piece of pork belly and put my thit kho together. It was a huge pot and it tasted so good I shared some with my parents and two sisters. At the end I only had enough for one meal; it wasn’t even enough to wrap it in rice paper so we ended up eating it with some rice. The thing that really made the whole meal was the sweet and sour bean sprouts. Funny how something so simple can lift the whole meal to a different level.

It was so easy to make. I cleaned the bean sprouts by removing some of the dark parts of the root. You can leave it as well, but it will look cleaner without. Then I boiled some water and added a bit of salt, some sugar and plain vinegar. It’s like making lemonade but then with vinegar.
Once the mixture is to my liking I poured it in a container right on top of the bean sprouts.
For some more flavor I added some thinly sliced onion.
Because I had too much vinegar I had enough to make some sweet and sour leeks as well. At first they were in a different container, but once there was room I added them to the bean sprouts.

Depending on how sour you make it, it takes a day or 2 to have picked bean sprouts. It keeps for about 5 days after the first day you start eating it.

 
It pairs great with some rice and thit kho. Here I made some fried rice with some left over thit kho. I enjoyed it so much I wish I could share it.

19 October 2011

The Seven Links Challenge


I’ve been tagged by Adora from Adora’s Box and I haven’t had the time to write about it. Adora is this lovely lady who lives in London and makes the prettiest pictures of her food. Her blog is great and she’s really good at food styling!

Today after eating my leftovers and while watching Master Chef Australia I thought it was time. Of course it helps that I’m home alone and there’s nothing interesting on tv today. Oh wait I’m following a new show called Camelot and it’s on today. Guess I have to make it short then =)

The most beautiful post:
I have so many post I’m proud of and it was really difficult to pick one. I decided to go for this “Bo kho” dish. Just because I manage to make it almost look like the dish I had in the restaurant when I was in Vietnam.
The most popular post:
I don’t know which one it is so I actually had to have a look. Looking at the comments the “Pesto Artisan Bread” got a lot of comments, but the one that got the most views is “Pickled eggplants”.
 

The most controversial post:
I don’t think I have any, but something that comes close I think is “Ruoc thit heo (shredded pork)”.
In Holland we have a saying “wat de boer niet kent, eet hij niet”. Whatever the farmer doesn’t know, he doesn’t eat. It actually hits the spot. Whatever Dutch people don’t know they just don’t eat and they won’t try it either. Because this looks kinda funny I don’t think I can sell it to people here, unless I get them to try it first.
The most helpful post:
Another difficult one. I would say “Lemon Curd”. Just because it shows how easy it is to make it yourself.
The post that was surprisingly successful:
Although it didn’t get any comments at all I got a lot of views on my “Better then sex tiramisu”. Yes some things are so good you would choose it over physical contact. Just too bad the picture doesn’t show how great it was.

This recipe was for big parties. For a party of 2 I wouldn’t even make it: just too much work.
The post that didn’t get the attention it deserved:

I would say “Banh Chung test drive”. Banh chung is the dish we eat during Tet and this was my very first attempt making it. It was a great experience and the whole family loved it lots. The only down thing is that you will have to cook it for 7-8 hours! Even so, I will have to make it again soon.

Adora thank you for tagging me. I had so much fun going through my old post again. When I first started was mainly for me to be able to remake my dishes again. But after I joined foodbuzz a whole new world opened up for me and my blog was becoming something more then just an archive for recipes. 

No bake mouse cake

I’ve got this fantastic book with recipes and pictures that can make chocolate lovers cry with joy. This particular recipe got my attention and I was lucky enough to have all the ingredients. So there was nothing to hold me back.
I was really looking forward to have this mascarpone quark pie. As you noticed the title is not mascarpone quark pie. Well maybe you didn’t but the bottom line is there is no mascarpone quark pie. I wish there was…that picture looks fantastic!
Let me tell you what happened:
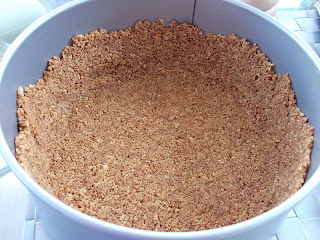
I started with making the pie crust with some amaretti cookies and melted butter. The recipe called for 275grams of amaretti cookies and 75 grams of melted butter. I used about 50 grams of butter and it was enough. As I don’t have a scale I eyeballed the cookies. One more or less wouldn’t be a problem.

I used a pestle to crush the cookies and then added the butter. After mixing it I poured it in a cake pan and use the round side of my spoon to press it to the sides and the bottom. And to make sure it was pressed enough I used a glass to press it even more. Then it had to set in the fridge for about 30 minutes. Mine was on the table waiting for the stuffing.

The stuffing called for 700 grams of mascarpone, 3 eggs, some vanilla, sugar, flour, coffee liquor, espresso and chocolate. I melted 100 grams of pure chocolate and added one cup of espresso, the zest of 1 orange and a bit of amaretto liquor (my own twist on the recipe).
Then I tried to cream the mascarpone with some sugar and egg yolks. And that’s where things went wrong. I don’t know what caused it (must be me of course) but the mascarpone started to curdle. It was a disaster! The pie was ready and needed to be stuffed and now the stuffing failed!! I was slightly panicking. Lucky I didn’t add the chocolate yet. Then I remembered I still had some whipping cream in the fridge. I took it out and started to whip it with some powdered sugar till it was still a bit runny.
To my melted chocolate I added 250 grams of mascarpone and mixed it till it was a smooth mixture. Then I added this to the whipped cream slowly bit by bit. I didn’t want to over mix this otherwise I would really be in trouble. Because of all that happend I totally forgot to take pictures!
When everything was mixed I was so happy. The mouse tasted GOOD (I couldn't resist licking the bowl)! I poured everything on the pie crust and put it in the fridge so it can set up.
The pie was a winner! The mouse just melts in your mouth. I can’t believe I never made this before. This idea was born out of panic. I think I should panic more often!

To make sure I’d be able to make this again I used:
-         275 grams of amaretti cookes (give or take)
-         50 grams of melted butter
-         ½ liter of whipping cream
-         250 grams of mascarpone
-         100 grams of dark chocolate
-         1 small cup of espresso
-         a dash of amaretto liquor
-         zest of one orange
-         powdered sugar

Make the crust with amaretti crumbs and butter.
Melt chocolate then add the coffee, orange zest, amaretto and when it cools off the mascarpone.
Whip the whipping cream till almost firm.
Add the chocolate mixture bit by bit.
Pour the stuffing in on the crust and let it set in the fridge.
Cut a slice or 2 and serve.

Ps: next time I would use a different cookie for the crust. This one was surpose to be baked in the oven and because it wasn't it got a bit soggy.

09 October 2011

Pesto Artisan bread

The other day Akheela from Torview won this great book “Artisan bread in five minutes a day” and she was so kind to share an artisan bread recipe with us. She also included a video from the authors showing how to make this very easy master dough. After seeing the video I was blown away. Could it really be this easy to make homemade bread? Can it be; no more fiddling with kneading and difficult ingredients?

I have to admit. I’ve see so many wonderful recipes and some I actually want to try myself...but I’ve never got to do it. This bread was just calling my name. So I decided to give it a try. If it’s really this easy, I will have homemade bread on the table more often.

I used the same recipe, but modified it to make it more convenient for me as European and American measurements are different.

All you need for about 4 loafs of bread is:
- 1,5 tablespoon yeast (1,5 package)
- 1,5 tablespoon salt
- 750 ml lukewarm water (* 3 cups of lukewarm water)
- 1 kilo flour (* 6,5 cups of flour)
- flour for dusting
- optional: cornmeal to put on the bottom
- 1 tablespoon of pesto

Four loafs of bread might be a bit too much to bake in one time, but if you refrigerate this dough you can use it up to 2 weeks. How great is that?
I put all the ingredients (flour in last) in a big bowl and use a wooden spoon to mix the flour in. The dough will stay very wet and that’s what it supposes to be.
Although it looks very lumpy and wet resist your adding more flour. Things will be ok, I promise.
As I wanted to experiment a bit with the dough I put about half of it in a different bowl. To this half I added one big tablespoon of homemade pesto.
 
I stirred it around a little, not incorporate it completely.

Then it was time to sit back and relax for about 2 hours so the dough could rice. I left it uncovered on the counter.
 
After 2 hours the dough almost doubled in size and was still wet, but dry enough to form some loafs. As I had way too much dough I stored the plain half in the fridge. It will continue to rise so make sure there is plenty of room for them to do so.  


I sprinkled some flour on top and on my hands and pulled off a piece of dough as big as a grapefruit. According to the authors this should be enough for a small family. By tucking the top to the bottom I formed a round loaf. On a flat surface I put some flour (as I didn't have any cornmeal) and place the dough there so it could rise for another 20-40 minutes. I don't have a pizza stone or any other flat surface so I use the bottom of a cake pan. Also I used a rectangle cake pan to put the rest of the dough in.

I preheated the oven on 230C degrees and put an empty tray on the bottom so I could create steam. Before the bread went in I dusted it with some flour and used a scissor to cut an “X” the top of the round dough and to make some cuts in the rectangle dough. Right after the bread is in the oven (in the middle) I poured a cup of hot water in the bottom tray and trapped the steam in.

The round bread was done in about 25 minutes. I baked the square loaf a bit longer; 35 minutes. When the round bread came out the X was completely gone. Next time I should cut it deeper.
They say not to cut the bread when it’s warm…and they were right. I cut it straight out of the oven and although it had a nice hint of pesto, the inside was a bit dense. But the crust was wonderful! So crunchy! It reminded me so much of a ciabatta bread.
This recipe is definitely a keeper. Akheela thank you so much for sharing this recipe and for showing us that it’s a piece of cake to make homemade bread!

08 October 2011

Profiteroles


The decision has been made and I’m some what relieved. I decided to go through and have my eyes corrected next month. I been wearing my glasses since Monday and noticed that everything is just a bit smaller then usual. Also my eye site without glasses is getting worse. Hopefully next month eye exam will go as expected and I’ll be glass/contact free by December. Just can’t wait!

I’ve been cooking, but not enjoying as much since I can’t get up close and personal with my food. When my glasses fog up again I remembered how happy I was with my contacts. Every now and then there are doubts, but I’m sticking on to my decision and counting the days till I can wear my contacts again. And of course eventually to be free of all the hassle =)

Yesterday I was surfing online looking for inspiration and hit a virus. That nasty thing deleted all the pictures I took *sigh*
Guess it’s time to make new ones.

I’ve been thinking all day what to make. I looked into (cup)cakes, but I am not a great (cup)cake baker so that’s a no go for now. Then I thought about bite size profiteroles, half of them filled with a lemon curd whipped cream and the other half with a Crème Pâtissière/whipped cream mixture. Here we normally have them filled with plain whipped cream, so this would be a nice twist.

For one batch of profiteroles I used:
- 200 gr all purpose flour (one cup)
- 125 gr butter (half a cup)
- 350 ml water (one cup)
- ½ teaspoon of salt
- 3 eggs
- 2 table spoons of sugar
- 1 bag of vanilla sugar
I started with boiling the water with the butter, the salt and the two sugars. 
Once the water boils and the butter is melted I took it off the stove and added one cup of flour.
I used a wooden spoon to stir everything and to incorporate the flour.
After a couple of minute the dough was no longer sticking to the pot and was nice and shiny.

Then it was time to add the eggs. I started with incorporating them one by one. At first it’s really hard to mix it, but you can see the dough come together and smoothen out.
After the third egg your dough would look like this; smooth and sticky.
I used my brand new piping bag to make this pretty profiterole. In fact I made a whole bunch of them.

I also made some log shaped. Can you believe I never used a piping bag before? I love it!
The oven was preheated on 215C degrees and these beauties were baked for 10-15 minutes. Then I turned down the oven to 180C degrees and bake them for another 10-15 minutes. To make sure the inside cooks as well I kept them in the “hot” oven after they were done.
 
They puffed up so beautiful!! How easy was that? After you tried this recipe you will never buy store bought profiteroles again.

I wanted to stuff them with the crème pâtissière but my piping bag broke down!! So if you’re piping bag does what it has to do, you can fill these profiteroles with a crème patisserie/whipped cream mixture, or some whipped cream with some homemade lemon curd. Or even with some plain whipped cream. With a little powdered sugar dust they will be gone in no time.