
Little brioche
molds! I’ve found these last Friday and I spend all Saturday looking for a
brioche recipe! I even look at some videos online and I never do that! So I knew
it was serious. Even though the hubby said no more cooking I had to do it.
 My sister in law got me these super cute measurement cups. No more
converting cups to grams! Thanks sis!
My sister in law got me these super cute measurement cups. No more
converting cups to grams! Thanks sis!
I’ve found several recipes, some very easy (mix all the ingredients together and you’re good to go) some more time consuming. As much as I would like to go for an easy recipe the pictures of the end product didn’t look as airy and fluffy as I wanted it to be. I wanted to have a brioche that didn’t need like 8 eggs and a ton of butter but still turned out light and fluffy. So I picked this one because most recipes talk about making a sponge first and this recipe seems to describe the steps the easiest:

I’ve found several recipes, some very easy (mix all the ingredients together and you’re good to go) some more time consuming. As much as I would like to go for an easy recipe the pictures of the end product didn’t look as airy and fluffy as I wanted it to be. I wanted to have a brioche that didn’t need like 8 eggs and a ton of butter but still turned out light and fluffy. So I picked this one because most recipes talk about making a sponge first and this recipe seems to describe the steps the easiest:
I know the 38
steps on the site are quite intimidating, but I’ll break it down in lesser
steps to make it easier. Everything is mixed in a stand mixer with a dough hook
so there’s really no need to knead it by hand. Also it takes a lot of (resting)
time before you can bake the brioche so make sure you either have plenty of
time or make one day ahead.
For the about
50 mini brioches or 3 loaves you’ll need to make the sponge first:
Put 1/3 cup
of lukewarm milk, 2 1/4 teaspoons of active dry yeast, 1 egg and 1 cup of all
purpose flour in a bowl and mix it till everything is blended. There will be
lumps of flour in there but don’t worry, this will all smoothen out. Then cover
the mixture with 1 cup of flour and set it aside uncovered for about 30-40
minutes.

After the
resting time you should see some cracks indicating that the yeast is active and
doing what it has to do. If you don’t see any cracks this means your yeast is
dead and you’ll have to make a new batch.
Now it’s time
to add the rest of the ingredients:
-
1/3
cup of sugar
-
1
teaspoon of salt
-
4
room temperature eggs slightly beaten
-
1
package of vanilla sugar (about 1 teaspoon)
-
1
½ cup of all purpose flour
-
185
grams of unsalted room temperature butter (I know the recipe talks about 6
ounces (about 170 gram) but I use a bit more)
Add everything
to the sponge mixture except for the butter and ½ cup of flour. Mix it in your
stand mixer with the dough hook on low till medium speed till all the flour is
incorporated then add the ½ cup of flour and mix it again for about 15 minutes
till you have a smooth dough. Make sure you stop every now and then to scrape
down the sides and the hook. A lot of dough will get stuck and try to work
their way up, just stop and push it back down. I don’t think I made the 15
minutes since my stand mixer was bumping up and down like crazy and I didn’t
want to overwork the machine. So I stopped when they dough got together and
wrapped itself around the hook. At this point the dough won’t be stuck to the
sides either.
Now it’s time
to incorporate the butter. Since it is room temperature it’s easier to mix it
in the dough. Mix it tablespoon by tablespoon till all the butter is
incorporated. Mix it till the dough wraps itself around the hook again and
slaps to the sides of the bowl. If needed add some more flour.

Butter a big
bowl and pour the dough in. It should be elastic and shiny. Cover it with plastic wrap and let it rest at room
temperature for about 2-2 1/2 hours or till it doubles in volume.

Then leave
the dough in the bowl but use your fingers to tuck the sides in. Work your way
around the dough till you tucked it all in and all the air is out. Then cover
it again and let it rest in the fridge for at least 4-6 hours, but preferably overnight.
The next day the dough double in size again and is ready for baking.
Since I had so much dough there was room for experimenting. I made 20 mini brioches in a brioche mold and 20 in my trusted mini muffin molds. And even then there was some dough left, so I chopped some dark chocolate and filled the dough to make some chocolate brioche.


After forming
the bread it had to rest for about 1 hour or till it doubled in volume again.
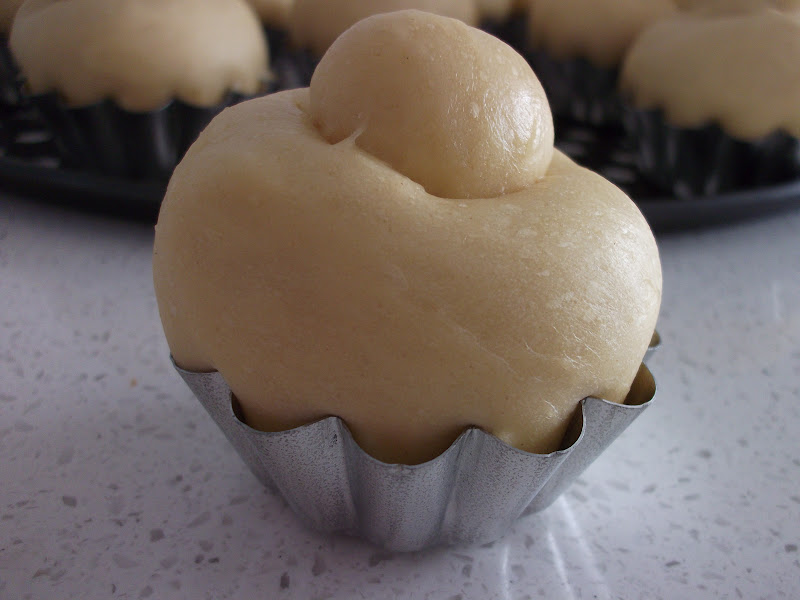

Brush it with some egg wash and bake it in a preheated oven (190C degrees as in the recipe is way too hot, 170C degrees is better) for about 15-25 minutes till they are golden. By now the house smells like a French bakery!


The brioche
was so light and fluffy. This recipe is a winner! I’ve never made brioche
before so if can do it…everyone can!
PS: if you
like your brioche sweet you should add some more sugar. For me it wasn’t sweet
enough!


