30 May 2011

Cod with rosemary potatoes

I think cod is one of the easiest fish to eat. It doesn’t have the strong fish smell and the bones are big and easily removed. And you can do pretty much everything you want with cod. I normally wrap it with some smoked bacon and bake it in the oven, but this time I wanted to try something else.
I put some olive oil on a piece of foil and put the fish on top. I seasoned it with some salt, pepper and garlic powder.
Then I added some slices of purple onion for some color and flavor.
I wrapped it into a nice package. To keep the heat inside I made sure I wrapped the fish in the shiny part of the foil. So if you ever wonder why foil has two different parts (shiny and non shiny) it’s just because one should be on the inside holding the heat.
One kind of potato I particular like is called Roseval. It is an oval shaped red/pink skinned potato. You can do pretty much everything with them. I chopped them in even pieces and boiled them for 5 minutes first. Then I mixed them with some olive oil, pepper, salt, some fresh garlic gloves, some fresh rosemary (out of my garden) and garlic powder and popped them in the oven on 160 degrees for 45 minutes. The last 30 minutes I added the fish packages.
I just love baked garlic gloves. They are soft and sweet and have a mild garlic flavor. Just delicious.
The cod came out very juicy and flakey. Unfortunately the onion has turn from deep purple to blue, which make it look less appealing. But the flavor was good. Next time I will not use the purple onion, but make a mix from tomatoes and bell peppers. That is something for another blog post.

Mixed baby leaves salad with scallops

If you happen to have a big bag of mixed baby leaves and you don’t know what to do with it…try this. It is super easy and you only need 3 ingredients: one big bag of mixed leaves, some raspberry dressing and some fresh scallops.
 
They don’t get much fresher then this. I got these beauties at my wholesale store. They were quite expensive; I think I got 15 pieces for about 12 euro. But they were forth every penny.
I only seasoned them with some garlic powder and some fresh grounded pepper and baked them in some olive oil and some butter. They only need a minute or so per side.
I put some raspberry dressing and some pepper on the salad and put a handful of it on a nice big plate. Then the scallops went right next to it. You wouldn’t say, but the raspberry dressing will go very well with the scallops. I never bother making the dressing myself since they have really nice ones all ready to go.
These scallops were slightly undercooked, just the way they should be. I can have a salad like this every day.

29 May 2011

Saturday's wedding menu

She was so pretty!!!
Yesterday my cousin and her husband tied the knot in church before God. They got lawfully married a few weeks earlier, but since they are both Catholic they wanted to get married in church as well. They had a nice church ceremony and afterwards we all headed over to the restaurant for the dinner party.
In Holland, if you are Asian, there are two kinds of parties. Either you host your party at an Asian restaurant (which can normally hold more then 100 people) or you do it the Dutch way meaning at a “western” restaurant with non Asian food. 
Their wedding reminded me so much of my own wedding. Me and the hubby had ours on a beach pier (same restaurant/hotel chain). I designed the menu myself with on one side the Dutch menu and on the other side an English one. The back ground was one of our wedding pictures. Not bad looking at all huh?
This was yesterday’s wedding menu. It was in the same style as their wedding invitation. I tried to capture all the courses, but the hubby didn't charge my camera so I missed the last 2 courses. It was a good thing other people had their camara so I can use some of their pictures.
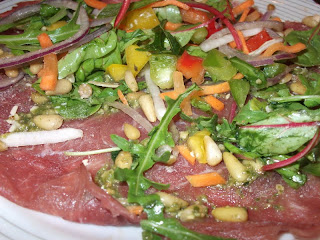
We started with some carpaccio (thinly sliced beef) with old cheese, pesto and pine nuts.
Then some chervil soup made with beef bouillon and onions.
The third course was common sole filet with salmon and hollandaise sauce together with some mash potatoes and carrots.
Before they served the forth course the bride and groom went to all the tables to make a toast with the guest and to collect their envelops/presents. It is custom to give an envelop with money, but some people like to pair that with a little gift. I just hope that whatever they received will be enough for them to break even the costs they had.

The forth course was waiting for us under the shiny cover. It was a veal entrecote coated with tomato melted mozzarella on a bed of steamed green beans. The entrecote was medium done and super soft. The only thing that killed the nice flavor was the mozzarella, so after the first bite that went to the side of the plate. My sister took a picture of this dish, but she hasn't forward it to me yet.
For dessert we had caramel parfait. It was nice to have something cold to end the meal.

Overall the food was good, but not excellent or outstanding and I think that if they knew the food would come out like this, they would’ve chosen a different menu or even a different location. With a wedding all people remember is the food, the service and how good/bad it was.
We all know how much work a wedding is. It all seems so romantic, but once reality hits you with all the work you need to get done before you get to party I can imagine that some people just rather want to live together. For those who aren’t willing to take that hurdle yet, your time will come. Being married is not bad…we just celebrated our 3 years anniversary last month and we’re still going strong. It’s been a great journey and the end is nowhere near.
Wishing everyone lots of love, succes and health!

27 May 2011

Strawberries

They are in season again! I was so happy to find these at my supermarket and they were on sale as well.
What you see here is one whole kilo. Doesn't look like much huh? Instead of trying to find a nice recipe I decided to wash them and to eat them one by one....slowly...
Aren't they just beautiful...they were evenly red and super sweet. Just the way they should be, almost like they just came from the field.
The only way to enjoy these is straight up, from the plate right in my mouth. I only wish I had more...

Banana bread

I had 3 bananas looking at me for a while now. I bought them when they were yellow and saw them slowly getting spotted with little brown spots. They were on the merge of turning brown and I was about to through them away. Then I remembered the one dish you could make with overly ripe bananas…banana bread!
I never had banana bread before. The one time I bought it in the States, I totally forgot to eat it. And with so much good food, I just didn’t felt the need to try them again. And now after making it myself I, no way I will eat store bought banana bread.

As you know I am not much of a baker, but I enjoy doing it more and more these days. Maybe one day I get to be good at baking also. Since this recipe turned out so good (I am having a slice as we speak) I thought I put it in writing so I can recreate it again next time. I made this bread Tuesday and now 3 days later it is still so moist that it looks and taste like I just baked it today.

For one loaf of banana bread you need:

- 1 cup wheat flour
- 1 cup self rising flour
- 2 eggs
- 1/2 cup vanilla yoghurt
- 3 ripe banana
- 75 gram raisins
- 1 teaspoon salt
- 2 tablespoons sugar
- 3 tablespoon butter (melted)
- 1 teaspoon cinnamon
- 1 teaspoon ginger
- 1/2 teaspoon vanilla
- 1 teaspoon baking soda
- 3 tablespoons peanut butter
- 75 gram dark chocolate (chopped in little bits and pieces)

I know it is a whole list of ingredients, but there are a few things you can leave out or substitute. Now you know why I had to put it in writing; I would never be able to remember next time.

Of course no banana bread without bananas so that is a definite must have, also the flour, eggs, butter, baking soda, salt and sugar has to be present. The rest is just optional.

Step by step this is what I did:

* Preheat the oven on 160 degrees.

* Peal the bananas and use a fork to smash them in a big bowl. You can smash them as much or as little as you like.

* Add the vanilla yoghurt and combined it with the bananas so they won’t turn brown.
* Add everything else besides the flour, baking soda and chocolate. Stir till everything is well mixed.

* Sift all the flower and the baking soda in the same bowl, mix it well and add the chopped chocolate.

* Grease a pan with some butter and put the mixture in.

* Set the oven for 65 minutes and wait patiently till the bread is done.

You can eat the bread just the way it is, warm, cold or after a few days. Make sure you wrap it in plastic or put it in a bag. It should still be good after a few days.
 
 
The hubby is always good being a guinea pig and he had a first bite. He liked it, but didn’t fancy the chocolate. Guess that’s just a women’s thing =) Everything is good with (extra) chocolate!

18 May 2011

Savoury glutinous rice balls


Yesterday I skipped dinner for an ambitious project. I wanted to try to make some savoury glutinous rice balls. We always order them when we eat dim sum. They’re always so tasty I decided to try and recreate them. I thought the outside looked similar to the Vietnamese “banh cam” so I seared online for something helpful. I found out that to get the sticky, chewy crust you need to use glutinous rice flour in combination with some plain rice flour. And most recipes included some boiled mashed potato for the nice golden crust. Unfortunately I didn’t had any potato so I tried without. 
I started with making the stuffing. I had about 1 kilo minced beef. You can use pork, chicken or whatever meat you like. And 1 kilo was way to much for the amount of dough I had so I think you’ll be fine with 500 gram meat also. I seasoned the meat with some salt, pepper, garlic powder (I love this stuff, always use it when I need to marinate food), sesame oil and some oyster sauce. To this I added one finely chopped onion, 3 gloves of minced garlic and one handful of minced dried  mushrooms. The same one I use for my spring rolls and wontons. 
Then I put one bag (400 gram) of glutinous rice flour and about 100 gram of rice flour in a bowl together with one table spoon of sugar and one teaspoon of salt. After mixing it all I put some water straight out of the faucet in the bowl. I just eyeballed it, but if I would’ve been more carefully would start with one cup of water and add more if needed. I mixed everything together till the dough had the consistency of play dough, not to wet and not to dry.  
I rolled some dough between my hands to get a nice ball, then pressed the middle with my thumbs and flatten it out for a bit. I put a bit of stuffing in the middle and then sealed the ball. After that I rolled it between my hands again to make it nice a round. I tried several round ones first, but found out that they were much harder to fry, especially since they didn’t keep their shape. For next batch I made them look like a log. These were much easier to fry.  
On a medium to hot stove I heated some sunflower oil in a non stick pan. Make sure there is enough to cover most of the food. I flipped the logs back and forth and use a strainer to press them down a bit. This will make them puff up. Some of them even burst so don’t stand to close. I flipped the burst ones and pressed the crack on the bottom of the pan. Sometimes that seals it. It took me 5 till 10 minutes to cook a batch. 
It is very difficult to brown them so it wasn’t easy to see if they were cooked on the inside. Next time I will use some mash potatoes so they will have a better colour.

Nevertheless they were crunchy, chewy and tasted almost like the one in the restaurant. They were good with and without sweet and sour sauce. I was so proud of myself! Job almost well done =)

I checked the leftovers this morning and they were still crunchy. If I could only improve the crust it would be perfect!  

16 May 2011

Fried wonton boats

Since I had so much stuffing left I thought it would taste good in a wonton wrapper; a fried wonton wrapper. And of course I didn’t have it at hand so I had to go out and get it. Did I mention that there are two kinds? One for frying and one for soup. I know that the one for soup can’t be fried, but I never tried the other way around before. Today I didn’t want to take my chances so I bought the wonton wrappers for frying.
And of course my egg is there to provide the clue that keeps my boats from sinking.
One big teaspoon of stuffing went on the wonton sheet. Then I put some egg white on the edges and fold them together.
These boats were way easier and faster to make then spring rolls and since I already had the stuffing it only took me about 30 minutes to go through one whole package of wonton.
 
All these boats need some oil to make them puff up.
As you can see I am only frying a small batch at one time. It is easier to keep an eye on them. They brown very fast and need room to peddle around.
Once they are ready put them on some paper towel so it can soak up some of the oil.

They were tasty on their own, but they were irresistible with some sweet and sour dipping sauce. Just one from a jar would do.

Vietnamese spring rolls

Sometimes you have a craving and when that happens to me I just have to give in to it. I had a bag of veggies (shredded white cabbage, carrots, leeks and bean sprouts) in the fridge so I wanted to make Vietnamese spring rolls.  So I went and get some minced chicken (only chicken this time) and some more packages of veggies. They are so handy because all the veggies I normally put in my spring rolls are already washed and cut in the right size.
I had one kilo of minced chicken to which I add some salt, pepper, garlic powder and one chopped onion and 3 cloves of garlic. Just eyeball the salt and garlic powder. I figured that as long as I cover everything with a small layer of spices it will be well seasoned.
I hydrated some dried mushrooms in hot water till they were soft and elastic. When they were ready I rinsed them and chopped them as small as I could.
In a big bowl, to the chicken I added 3 bags of veggies (about 400 grams per bag), some thinly sliced jicama, the dried mushrooms and a handful of glass noodles which I also soaked in hot water to make them softer.

I mixed everything together and to make sure it was well seasoned I put one teaspoon of the mixture in a hot non stick pan. I never try uncooked raw meat, especially not chicken and cooking/frying it is a much better alternative. So after the mixture was cooked I had a bite and added some extra salt. I know some people just make the meat mixture and roll the spring rolls, but how do you know how it would taste if you don’t test it first? So I always test it. Once it is wrapped there is no way back.

For my spring rolls I use wheat flour sheets in stead of rice paper. Rice paper does not stay crispy for long and since they are very thin they have more chance on bursting. My sheets came from the freezer and because I like small spring rolls I cut them in half giving me 2 triangles.
I start by putting some stuffing on the sheets.
Then I fold one side over.
Then the other side. Make sure you tuck the stuffing in.
Hold everything together and then lift the bottom.
Tuck the bottom in and press the stuffing together.
Roll it up and use some egg white to seal the roll.

Taraaa one spring roll down…so many more to go. I don’t make it often so it takes me some time to roll a batch. But the more you make the easier it gets. 

Because it is so time consuming I always make a lot. I fried one batch just to taste it and put the rest in the freezer. Always handy to have a snack like that at hand. Unfortunately they were so jummie that we ate them before I could should a picture. Next time…there is always a next time.