30 May 2012

On my BBQ table: freshly made garlic herb butter

You only know what you have when it’s gone. This is so very true. The last couple of days we had amazing weather. Although there was a lot of complaining about the heat and the pollen in the air, it was so nice. It was like having a holiday in our own country. After work we went biking to the beach and to Delft and we spent lots of time outside soaking in the sun. And of course in one week we had like 2 bbq parties!
After being spoiled for a week or so the temperature dropped and the sun somewhat disappeared. And it got cold! Well not really cold, but cold comparing to what we use to have. But it’s only spring so we have high expectations for a warm and sunny summer. 

To prepare for the bbq season and because everyone seem to love my bbq parties I will share some of the party flavours with you. 

If you are planning a bbq party or attending one, I have this amazing, but yet simple, recipe for something that can be eaten with pretty much everything. It’s great to have on your bbq table and even better to bring it as a present when you are invited. Of course I’m talking about garlic herb butter! I don’t know how common this is worldwide, but we Dutchies love our garlic herb butter! 

You can use a much or as little of the ingredients as you like; there is no right or wrong with this recipe. 

All you’ll need is:
- Good room temperature butter (I used 250 gram)
- Finely chopped chives (3 big tablespoons)
- Finely chopped parsley (3 big tablespoons)
- Garlic cloves (4 cloves finely grated)
- Few drops of lemon (about a teaspoon)
- Salt and pepper (1 teaspoon salt and as much pepper as you feel like having) 
I was so lucky that I could use fresh herbs from my yard! They look so fresh, vibrant and green. I just love my garden!
I started with chopping all the herbs as finely as I could.  
Then I added the salt, pepper, lemon juice and the minced garlic cloves and mixed this in with the butter. I put it in the fridge for a couple of hours and took it out about 30 minutes before dinner. 
This butter is AMAZING on some French bread and it will taste even better if you put the bread on the bbq so the butter can melt a little...
You can even put a bit on top of your steak or use it to rub it under a chicken skin before roasting it. How about brushing some of it on a corn on the cob? Or adding it to some mash or roast potatoes? The possibilities are endless!

You can keep this butter in the fridge for a couple of days and I believe you can even freeze it in the freezer. But to keep the nice fresh herb flavour I would just make enough and make more when needed. Something this easy doesn't have to be made in bulk.

I hope you’ll think about this butter when you’re having a bbq party!


Ps: I haven’t found any place where I could donate some of my food at…still searching. Also my body is sore all over from running, biking and exercising. Hopefully it pays off in a couple of weeks!

23 May 2012

Cinnamon sugar coated mix nuts

It seems like I’m back on the horse again! Well as a figure of speech…(I’m afraid of horses, especially the big ones). After sharing a few recipes I’m really in the mood for blogging! And to visit other blogs to see what I’ve been missing since my long break.
I’m soooo happy! For a while it looked like I didn’t have any inspiration at all!

Before I share this recipe…remember a while back I mentioned that I wanted to lose some weight? Well I actually tried to run here and there while I was on holiday beginning of this year, but after I got home it was quite difficult to motivate myself. When it’s cold outside, I’m not really in the mood to run or to make any move at all hihhi.
Yesterday the weather was extremely nice so my coworker and I agreed on running every Tuesday right after work. Since running one day a week doesn’t really make you lose anything I decided to try and see if I can run every day. Well at least when it isn’t raining then. Today after work I went home and started to run. Although it was not even for 30 minutes I was very proud that I did it! My whole body hurt from yesterdays run, but I still did it. Bonus points for me!
If I can only do it for 30 minutes (to start with) every day I might be good to go by the end of the summer. I miss the days that I could run for 45 minutes straight without having to stop for air. Now I can only run for 5 minutes and then I’ll have to walk for about 1-2 minutes to get my breath back!
But I’m determined and it has to happen now. I’ve been eating way too good and been packing on some more then I wanted. Starting beginning next month I’ll be on a low carb diet…so no more rice, potato, bread, pasta…and all other stuff I like so much.
That reminds me…I need to find someone to donate my food to. Well not the low carb stuff, but the bread, cakes and cookies I’m still planning on baking. Just because I can’t eat it (well shouldn’t eat it) doesn’t mean I can’t make it right? The neighbors can only eat so much also, so maybe a charity or something…I’ll need to look into that.
Anyway these cinnamon sugar coated mix nuts are so easy to make. All you need is 2 handful mixed nuts (or just almonds, cashews or whatever nuts you like), 3 tablespoons of sugar, a sprinkle of salt and a pinch or 2 of cinnamon.
I started with toasting the nuts in a non stick pan.
When they started to release some flavor I added 3 tablespoons of sugar, the salt and cinnamon and mixed that with the nuts.
Because all the sugar was stuck to the nuts I added 2 tablespoons of water and waited till the sugar turned to caramel and coated the nuts.
When all the nuts are covered with the sugar /caramelmixture I poured it on a baking sheet so they could cool a bit and I could pull them apart. Not all the sugar dissolved so you can see some clumps of sugar. I think next time I would melt the sugar with a bit of water first and then add the toasted nuts.
I ate a few of them after they completely cooled and they weren't bad. Even though I didn't add any butter, they some how tasted like I did!

It’s a good thing my parents are coming over tomorrow so they can finish the rest of the nuts. You’ll have to admit; they look much more appealing than the nuts in the first picture.

20 May 2012

Banana jam

After baking those lovely mini brioches today I was in the mood for some more “experimenting”. I have 3 so very over the top ripe bananas that had to be eaten. One more day and it was ready for the trash. So I really really had to use them. I didn’t want to make any banana bread or banana cake or anything else for that matter. I still have a lot of brioches we have to finish so it had to be something that could go with them. What else would go better with homemade brioche than some jam? This is just too easy. I’ve made jam before…I even accidently made jam when I wanted to make syrup! So this is what I did:
I squeezed the juice of one lime in a bowl. This was a very juicy lime so I ended up with about 60 ml juice. Then I pealed the bananas and sliced them about ½ cm and dropped them in with the lemon.
 
I don’t really like my jam too sweet so I started with adding 7 tablespoons of sugar; if needed I could always add some more. Then I added a good pinch of salt and about a teaspoon of cinnamon. I mixed everything and started to cook it in a pot.
Just when the sugar started to dissolve I had a taste. It was just perfect. It had a nice balance between sweet and sour, just the way I like it.
I added a drop of rum flavorings and cooked it till the jam thickens. There was a bit of foam so I scooped that off. The whole house smells so nice now...great combination of cinnamon and banana.
I poured it in a sterilized jar and let it rest upside down for a bit. After 15 minutes I turned it back up and after it cools off it will go in the fridge. Hope it will thicken more when it cools.
And it did!
It was sooo good with the brioche!

Mini brioche bread

I haven’t been so excited about food for a long time. The reason why…
Little brioche molds! I’ve found these last Friday and I spend all Saturday looking for a brioche recipe! I even look at some videos online and I never do that! So I knew it was serious. Even though the hubby said no more cooking I had to do it.
My sister in law got me these super cute measurement cups. No more converting cups to grams! Thanks sis!

I’ve found several recipes, some very easy (mix all the ingredients together and you’re good to go) some more time consuming. As much as I would like to go for an easy recipe the pictures of the end product didn’t look as airy and fluffy as I wanted it to be. I wanted to have a brioche that didn’t need like 8 eggs and a ton of butter but still turned out light and fluffy. So I picked this one because most recipes talk about making a sponge first and this recipe seems to describe the steps the easiest:
I know the 38 steps on the site are quite intimidating, but I’ll break it down in lesser steps to make it easier. Everything is mixed in a stand mixer with a dough hook so there’s really no need to knead it by hand. Also it takes a lot of (resting) time before you can bake the brioche so make sure you either have plenty of time or make one day ahead.
For the about 50 mini brioches or 3 loaves you’ll need to make the sponge first:
Put 1/3 cup of lukewarm milk, 2 1/4 teaspoons of active dry yeast, 1 egg and 1 cup of all purpose flour in a bowl and mix it till everything is blended. There will be lumps of flour in there but don’t worry, this will all smoothen out. Then cover the mixture with 1 cup of flour and set it aside uncovered for about 30-40 minutes.
 
After the resting time you should see some cracks indicating that the yeast is active and doing what it has to do. If you don’t see any cracks this means your yeast is dead and you’ll have to make a new batch.
Now it’s time to add the rest of the ingredients:
-       1/3 cup of sugar
-       1 teaspoon of salt
-       4 room temperature eggs slightly beaten
-       1 package of vanilla sugar (about 1 teaspoon)
-       1 ½ cup of all purpose flour
-       185 grams of unsalted room temperature butter (I know the recipe talks about 6 ounces (about 170 gram) but I use a bit more)
Add everything to the sponge mixture except for the butter and ½ cup of flour. Mix it in your stand mixer with the dough hook on low till medium speed till all the flour is incorporated then add the ½ cup of flour and mix it again for about 15 minutes till you have a smooth dough. Make sure you stop every now and then to scrape down the sides and the hook. A lot of dough will get stuck and try to work their way up, just stop and push it back down. I don’t think I made the 15 minutes since my stand mixer was bumping up and down like crazy and I didn’t want to overwork the machine. So I stopped when they dough got together and wrapped itself around the hook. At this point the dough won’t be stuck to the sides either.
Now it’s time to incorporate the butter. Since it is room temperature it’s easier to mix it in the dough. Mix it tablespoon by tablespoon till all the butter is incorporated. Mix it till the dough wraps itself around the hook again and slaps to the sides of the bowl. If needed add some more flour.
Butter a big bowl and pour the dough in. It should be elastic and shiny. Cover it with plastic wrap and let it rest at room temperature for about 2-2 1/2 hours or till it doubles in volume.
Then leave the dough in the bowl but use your fingers to tuck the sides in. Work your way around the dough till you tucked it all in and all the air is out. Then cover it again and let it rest in the fridge for at least 4-6 hours, but preferably overnight.

The next day the dough double in size again and is ready for baking.

Since I had so much dough there was room for experimenting. I made 20 mini brioches in a brioche mold and 20 in my trusted mini muffin molds. And even then there was some dough left, so I chopped some dark chocolate and filled the dough to make some chocolate brioche.
After forming the bread it had to rest for about 1 hour or till it doubled in volume again.
 
Brush it with some egg wash and bake it in a preheated oven (190C degrees as in the recipe is way too hot, 170C degrees is better) for about 15-25 minutes till they are golden. By now the house smells like a French bakery!
The brioche was so light and fluffy. This recipe is a winner! I’ve never made brioche before so if can do it…everyone can!

PS: if you like your brioche sweet you should add some more sugar. For me it wasn’t sweet enough!

18 May 2012

Me throught Vannie's eyes

Yesterday my dear friend Tuyet invited us over for dinner. It was a last minute dinner plan but that’s the way we roll. We’re not much into making an appointment way ahead. If we feel like seeing each other we just call and drop by. So when she invited us yesterday I wanted to bring her something nice. I made some shredded pork and she loved it.

She and her husband Cuong have 2 wonderful daughters, Vannie and Rosa. Now that they see us more often they aren’t so shy anymore. They always like to take me up to their room where they play (either together or by themselves) and goof off. And those girls love to goof off! They are also very much into drawing and all kinds of creative activities. They even like to help cooking!
 
Anyway Vannie and Rosa made me some drawings.
This is how I look like according to Vannie. She’s very talented isn’t she! I think she made me much prettier then I actually am =)
Some more drawings from the girls. I love how kids make things seem so simple.
Tuyet thank you so much for the invite and the food that we got to go! We’ll see each other very soon!

PS: I’ll put the recipe for the chocolate dessert up in a few days!

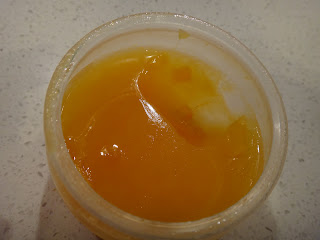
Homemade citrus jelly

To celebrate the start of nicer, warmer weather I’m sharing this super easy jelly recipe. I wish I could say I invented it myself cuz its brilliant, but I didn’t. I’ve seen it on tv somewhere and though darn, that’s a great recipe. Unfortunately I don’t quit remember where and from whom the recipe is. All I know is that the original recipe was made with lots of mandarins. 

I love mandarins (when they are in season) but they aren’t anymore. And my mom still buys them so I ended up with 2 kilo’s of mandarins that weren’t really tasty to eat like that. But they are great for this jelly!

I ended up using all the citrus fruits I had. For this jelly I use:
- whole bunch of mandarins
- some Minneola tangelos (a crossing between a grapefruit and a tangerine)
- some oranges
- 5 sheets of gelatin (7,5 gram)
- 2 tablespoons of sugar
- 1 pinch of salt
- 1 sharon fruit (kaki or persimmon) 
Do you like my squeezer? It’s a UFO and so super cute. And very helpful too. I normally stick a fork in half a citrus and twist it around till all the juice is out, but this works a lot better for a big bunch like this. 
I squeezed all the citrus till I had about 500 ml of juice. After tasting it I decided to add 2 tablespoons of sugar to make it a bit sweeter. I also added a pinch of salt.

I like my jelly smooth so after straining the juice a splash went in a bowl so it can heat it in the microwave for a couple of seconds. I need some warm juice so I could dissolve the gelatin. I always soak the gelatin sheets in some cold water first till they are flexible and rubbery. This would make them dissolve better. 
When the gelatin is completely mixed I added it to the rest of the juice. I pealed one sharon fruit and diced it in little cubes.
I added a couple of cubes in a little container and poured in the juice. After wrapping them up in plastic foil they all went in the fridge.
Crossing my fingers that they’ll set…and they did! 
I enjoyed my jelly lots. It’s a great way of using citrus fruits. 
I’m off doing my yard…most of my plants survived the harsh winter so I’m very pleased. Hopefully this year we’ll have lots of blueberries, raspberries, figs, strawberries and herbs. I love homegrown food!